
Developing your add-on
Getting started with add-on development
After having Set Up all the necessary tools and environments, you can start developing your add-on. The following steps will guide you through this process.
Before starting development, An excellent first step is to look at the available Recipes and Examples for inspiration or insight or the Marketplace to prevent you from reinventing the wheel.
Create a new add-on
Now that you have set up your development environment and decided on the add-on you want to develop, you can start creating your add-on. You will need to go to the developer portal and navigate to the "My Add-ons" page. You can do this by using the following link:

Here, you can see all your add-ons. Click on the "Create new add-on" button to create a new add-on, which will give you the following prompt to fill in the details of your add-on:
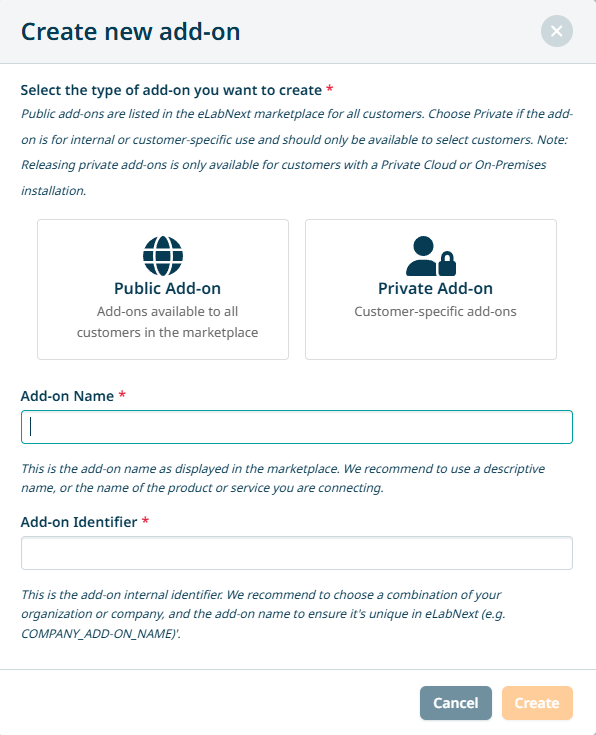
Important to note here is that the Marketplace listing type of either Public or Private is permanent. If you need to modify this, you must create a new add-on with the desired listing type.
When you have filled in the details of your add-on, click on the "Create" button to create your new add-on. You are then redirected to the add-on overview. You could already fill in the add-on details and information, but this is mainly important for the Publishing of your add-on.
The main point of interest here is under the code section and is the template download. This button will provide you with a template to start developing your add-on.

To make sure that your add-on file has all the mandatory elements, you can check the following recipe:
Developing your add-on
Now that you have downloaded the template and all the mandatory elements are present, you can start developing your add-on. We recommend using JavaScript for add-on development because the eLabNext SDK has been written in JavaScript. The eLabSDK1 and eLabSDK2 are the key components that allow you to integrate your functionality, add-on, or application with eLabNext. Important to note here is that eLabSDK2 is the SDK run on the inventory V2 pages of eLaBNext.
The other powerful key component for developing your add-on is the eLabNext API. The eLabNext API is a RESTful API that allows you to interact with eLabNext and its data. This API is used to retrieve data from eLabNext, send data to eLabNext and to perform actions in eLabNext. As stated earlier, you can make API calls by using the eLabSDK.API.
With this, you should have all the tools to develop your add-on. If there is any functionality you want to see added or is missing at the moment, please don't hesitate to Contact Us. We are always looking for ways to improve our platform and are happy to help you with any questions or problems.
Updated 3 days ago